
Craving a sweet and simple treat? Chocolate covered marshmallows are the answer! This guide shows you how to make them.
Indulge in Homemade Chocolate Covered Marshmallows
Who can resist a fluffy marshmallow dipped in rich, melted chocolate? Chocolate covered marshmallows are a classic treat, perfect for any occasion. They’re surprisingly easy to make at home. Plus, you can customize them with your favorite toppings. From sprinkles to nuts, the possibilities are endless. Let’s dive into making these delightful goodies!
Why You’ll Love These Chocolate-Dipped Marshmallows
- Simple Ingredients: You only need a few basic items.
- Quick to Make: Ready in under an hour.
- Customizable: Add your favorite toppings and flavors.
- Perfect for Gifts: A thoughtful homemade present.
- Kid-Friendly: A fun activity to do with children.
The Joy of Making Your Own Treats
Making treats at home is rewarding. You control the quality of what you eat. Additionally, homemade gifts carry a special meaning. These chocolate-covered delights are no exception. Enjoy the process and savor the result.

Ingredients:
- Marshmallows:
- 1 (10-12 ounce) bag of large marshmallows. Jet-Puffed brand is a great choice for classic flavor.
- Alternative: Mini marshmallows (approximately 2 cups). Work well if you prefer smaller, bite-sized treats.
- Chocolate:
- 12 ounces (340g) good quality chocolate. This can be chocolate chips, a chocolate bar broken into pieces, or chocolate melts.
- Options: Milk chocolate, dark chocolate (at least 60% cacao for rich flavor), white chocolate, or semi-sweet chocolate.
- Recommendation: Ghirardelli, Valrhona, or Guittard for superior taste and melting properties.
- Melting Aid (Optional):
- 1 tablespoon shortening (like Crisco) or coconut oil. This helps the chocolate melt smoothly and prevents seizing.
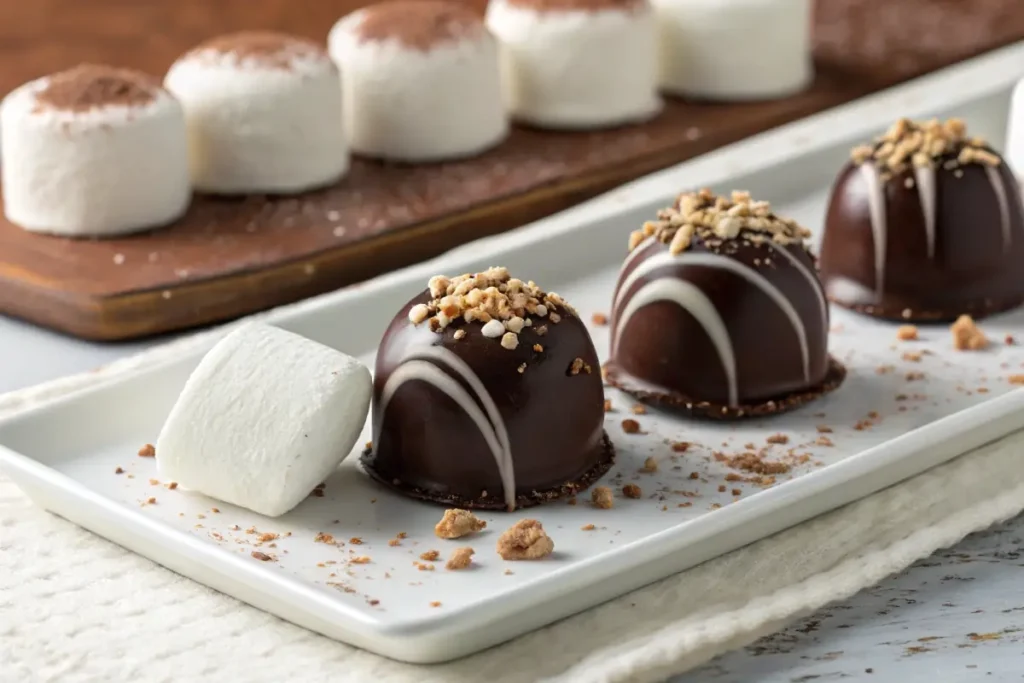
- Toppings:
- Sprinkles: Rainbow sprinkles, chocolate sprinkles, seasonal sprinkles.
- Nuts: Chopped peanuts, almonds, pecans, walnuts, toasted coconut flakes.
- Other: Sea salt, crushed peppermint candies, crushed Oreo cookies, mini chocolate chips, edible glitter, crushed graham crackers.
Equipment:
- Baking Sheets: 1-2 baking sheets.
- Parchment Paper or Wax Paper: To line the baking sheets and prevent sticking.
- Double Boiler or Microwave-Safe Bowl: For melting chocolate.
- Spatula or Spoon: For stirring the chocolate.
- Fork or Dipping Tools: For dipping the marshmallows. Skewers also work for large marshmallows.
- Optional: Lollipop sticks if you wish to make marshmallow pops.
Choosing the Right Ingredients
Selecting quality ingredients elevates the final product. For instance, using premium chocolate will make a noticeable difference. Fresh marshmallows ensure a soft and delightful bite. Consider these details when shopping. The type of marshmallow also matters. Jet-puffed marshmallows work best for a classic taste and texture. However, artisanal or homemade marshmallows offer a unique, gourmet touch.

Step-by-Step Guide to Dipped Marshmallows: The Detailed Method
Ready to start creating? Follow these simple, expanded steps for the best chocolate covered marshmallows:
- Prepare Your Workspace:
- Line your baking sheet(s) with parchment paper or wax paper. This prevents the chocolate covered marshmallows from sticking and makes cleanup easier. Set aside.
- If using large marshmallows and wanting to make pops, gently insert a lollipop stick into the bottom of each marshmallow. This provides a handle for dipping.
- Prepare your toppings. Place your chosen toppings in small bowls for easy access during the dipping process.
- Melt the Chocolate:
- Using a Double Boiler: Fill the bottom pot of a double boiler with about an inch of water. Bring the water to a simmer over medium heat. Place the chocolate (and shortening or coconut oil, if using) in the top pot. The steam from the simmering water will gently melt the chocolate. Stir frequently with a spatula until the chocolate is completely smooth and melted. Be careful not to let any water get into the chocolate.
- Using a Microwave: Place the chocolate (and shortening or coconut oil, if using) in a microwave-safe bowl. Microwave in 30-second intervals, stirring well after each interval. Continue until the chocolate is almost completely melted, then stir until smooth. This prevents the chocolate from overheating and burning.
- Dipping Time!:
- Hold a marshmallow by the bottom (if using a stick) or carefully spear it with a fork.
- Dip the marshmallow into the melted chocolate, coating it completely. Use the fork or dipping tool to gently rotate the marshmallow, ensuring an even coating of chocolate.
- Lift the chocolate covered marshmallow out of the chocolate and gently tap the fork or dipping tool against the side of the bowl to remove any excess chocolate. This prevents the coating from being too thick and messy.
- Add Toppings Immediately:
- While the chocolate is still wet, immediately sprinkle your desired toppings onto the chocolate covered marshmallows. The chocolate will set quickly, so you need to work fast.
- If you want to use larger toppings like chopped nuts, gently press them into the chocolate coating to ensure they adhere properly.
- Set the Chocolate:
- Place the dipped marshmallows on the prepared baking sheet, spacing them slightly apart to prevent them from sticking together.
- Place the baking sheet in the refrigerator for about 15-20 minutes, or until the chocolate is firm and set. This allows the chocolate to harden quickly and gives the chocolate covered marshmallows a nice, crisp texture.
- Enjoy!
- Once the chocolate is firm, remove the chocolate covered marshmallows from the refrigerator.
- Carefully peel them off the parchment paper.
- They are now ready to eat, share, or package as gifts!

Tips for Perfect Dipping
- Don’t Overheat the Chocolate: Burnt chocolate tastes bitter. Use low heat and stir frequently.
- Work Quickly: The chocolate sets fast. Prepare all your toppings beforehand.
- Use Room Temperature Marshmallows: They dip easier. Cold marshmallows can cause the chocolate to seize.
- Tap off Excess Chocolate: Avoid thick, uneven coatings. Gently tap the fork against the bowl.
Troubleshooting Common Issues
Sometimes, things don’t go as planned. Here are some common problems and how to fix them:
- Chocolate Seizing: This happens when water gets into the chocolate. Try adding a tablespoon of shortening. Stir vigorously.
- Uneven Coating: Ensure the chocolate is smooth and fully melted. Use a dipping tool for better control.
- Toppings Not Sticking: Apply toppings immediately after dipping. The chocolate sets quickly.
Delicious Variations of Marshmallow Treats
One of the best things about this recipe is its versatility. Try these fun twists:
- Peppermint Bark: Dip in dark chocolate and sprinkle with crushed peppermint candies.
- Salty Caramel: Use milk chocolate and sprinkle with sea salt. Add a drizzle of caramel sauce.
- Rocky Road: Dip in dark chocolate and top with mini marshmallows and chopped nuts.
- Cookies and Cream: Dip in white chocolate and sprinkle with crushed Oreo cookies.
- Espresso Delight: Add a shot of espresso powder to your melted dark chocolate.
Taking Flavors to the Next Level
Consider infusing your chocolate with flavors. Orange zest, chili powder, or even a hint of cinnamon can add complexity. Experiment and discover your favorite flavor profiles. Consider extracts, like vanilla or almond, for a subtle enhancement.
Unique Topping Ideas
- Chopped pretzels
- Toasted coconut flakes
- Edible glitter
- Crushed graham crackers
- Dried fruit
- Mini chocolate chips
- Chopped peanut butter cups
- Rainbow sprinkles
- Crushed potato chips (for a sweet and salty combo!)
Chocolate Marshmallow and Dietary Needs
Adapting this recipe for different diets is possible. Here’s how:
- Gluten-Free: Most marshmallows are already gluten-free. Ensure your toppings are too.
- Dairy-Free: Use dairy-free chocolate. Coconut oil works well for melting.
- Vegan: Find vegan marshmallows (some brands exist). Use dairy-free chocolate.
- Lower Sugar: Look for sugar-free chocolate options. Some brands offer sugar-free marshmallows, too.
Considerations for Allergies
Always check ingredient labels carefully. Be mindful of common allergens like nuts, soy, and dairy. Make sure your workspace is clean to avoid cross-contamination.
Storing Your Homemade Treats
Proper storage keeps your chocolate covered marshmallows fresh. Here’s how to do it:
- Airtight Container: Store in a cool, dry place.
- Layer with Parchment: Prevent sticking.
- Avoid Warm Temperatures: The chocolate will melt.
- Refrigerate if Needed: If your kitchen is warm, refrigeration helps.
- Shelf Life: They usually last about 1-2 weeks.
Preventing Melting and Sticking
Melting and sticking are common storage issues. To prevent this, keep them away from direct sunlight and heat. Layering with parchment paper is crucial. If you live in a warm climate, refrigeration is your best bet.
Prolonging Marshmallow Chocolate Freshness
Keeping your treats fresh is key. Proper storage preserves flavor and texture. Check them regularly for any signs of melting or stickiness. Discard if they become sticky or develop an off odor.
Chocolate Marshmallow for Every Occasion
These treats are perfect for any event:
- Holidays: Customize with seasonal sprinkles.
- Parties: A crowd-pleasing dessert.
- Gifts: Wrap them beautifully for a thoughtful present.
- Movie Nights: A sweet snack to enjoy.
- Just Because: Treat yourself!
Creative Presentation Ideas
Presentation matters. Here are some ideas:
- Gift Boxes: Arrange them in decorative boxes with ribbons.
- Lollipop Sticks: Use lollipop sticks for easy handling.
- Themed Platters: Create platters with complementary sweets.
- Individual Bags: Package them individually for party favors.
Making Them Special
Adding personal touches elevates these treats. Consider custom packaging or unique flavor combinations. This simple recipe transforms into something truly special. Hand-written notes add a personal touch when giving them as gifts.
Understanding Different Types of Chocolate
Choosing the right chocolate is crucial. Here’s a quick guide:
- Dark Chocolate: Rich and intense.
- Milk Chocolate: Sweet and creamy.
- White Chocolate: Buttery and sweet.
- Chocolate Melts/Candy Coating: Easy to use and sets firm.
The Importance of Chocolate Quality
Investing in quality chocolate makes a huge difference. Better chocolate melts smoothly. It also delivers a richer flavor. Don’t skimp on this key ingredient!
Tempering Chocolate for a Professional Finish
For a glossy, professional finish, consider tempering your chocolate. Tempering involves heating and cooling the chocolate to specific temperatures. This process stabilizes the cocoa butter. The result is a smooth, shiny, and crisp chocolate coating. While it requires a bit more effort, the results are worth it. You can find detailed instructions online or in cookbooks.
Equipment Essentials for Chocolate Covered Perfection
While the recipe is simple, having the right tools makes a difference.
- Double Boiler: Essential for melting chocolate gently.
- Silicone Spatulas: Heat-resistant and easy to clean.
- Dipping Tools: Forks, skewers, or specialized dipping tools.
- Parchment Paper: Prevents sticking.
- Baking Sheets: For setting the chocolate.
- Candy Thermometer: If tempering chocolate.
Alternative Melting Methods
If you don’t have a double boiler, don’t worry. A heatproof bowl set over a simmering pot of water works just as well. Just ensure the bowl doesn’t touch the water. The microwave is another option. Melt the chocolate in short intervals, stirring in between.
Scaling the Recipe Up or Down
This recipe is easily scalable. Double or triple the ingredients for larger batches. Halve them for smaller portions. Adjust cooking times accordingly. Consider the size of your equipment when scaling up.

Chocolate Covered Marshmallows as a Business Idea
Chocolate covered marshmallows can be a profitable venture. They’re easy to make and highly customizable. Here are some tips for starting your own business:
- Perfect Your Recipe: Ensure consistent quality.
- Offer Customization: Allow customers to choose flavors and toppings.
- Create Attractive Packaging: Make your product visually appealing.
- Market Online: Use social media and local marketplaces.
- Sell at Events: Farmers’ markets, craft fairs, and local festivals.
Legal and Regulatory Considerations
Before starting a food business, research local regulations. You may need permits or licenses. Follow food safety guidelines to ensure your products are safe.
Exploring Global Variations
While chocolate covered marshmallows are a classic American treat, similar confections exist worldwide. Exploring these variations can inspire new ideas.
- Brigadeiros (Brazil): Chocolate fudge balls coated in sprinkles.
- Rocky Road (Australia): Marshmallows, nuts, and chocolate.
- S’mores (North America): Toasted marshmallows and chocolate between graham crackers.
Adapting Recipes from Around the World
Try incorporating elements from these global treats into your chocolate covered marshmallows. For example, add nuts and dried fruit like a Rocky Road. Or roll them in chocolate sprinkles like a Brigadeiro.
Pairing Chocolate with Complementary Flavors
The right flavors can elevate the chocolate experience.
- Nuts: Almonds, pecans, walnuts, and peanuts.
- Spices: Cinnamon, nutmeg, and chili powder.
- Fruits: Berries, citrus zest, and dried fruits.
- Coffee: Espresso powder or coffee extracts.
- Salt: Sea salt or flavored salts.
Creating Harmonious Combinations
Experiment with different combinations. A little salt can enhance the sweetness of the chocolate. A pinch of chili powder adds a surprising kick. Citrus zest brightens the flavor.
Frequently Asked Questions (FAQs)
What is a chocolate covered marshmallows called?
It is simply called a chocolate covered marshmallow.
How to make chocolate coated marshmallows?
Melt chocolate, dip marshmallows, add toppings, and let set.
How long can chocolate covered marshmallows last?
They typically last 1-2 weeks when stored properly.
What is a German chocolate kiss?
German chocolate kisses don’t exist; you might be thinking of a traditional chocolate kiss with a German chocolate cake flavor or a German Chocolate candy bar.