
A princess cake is a layered delight that looks as good as it tastes. Learn to make this Swedish classic at home with our easy guide.
What is a Princess Cake?
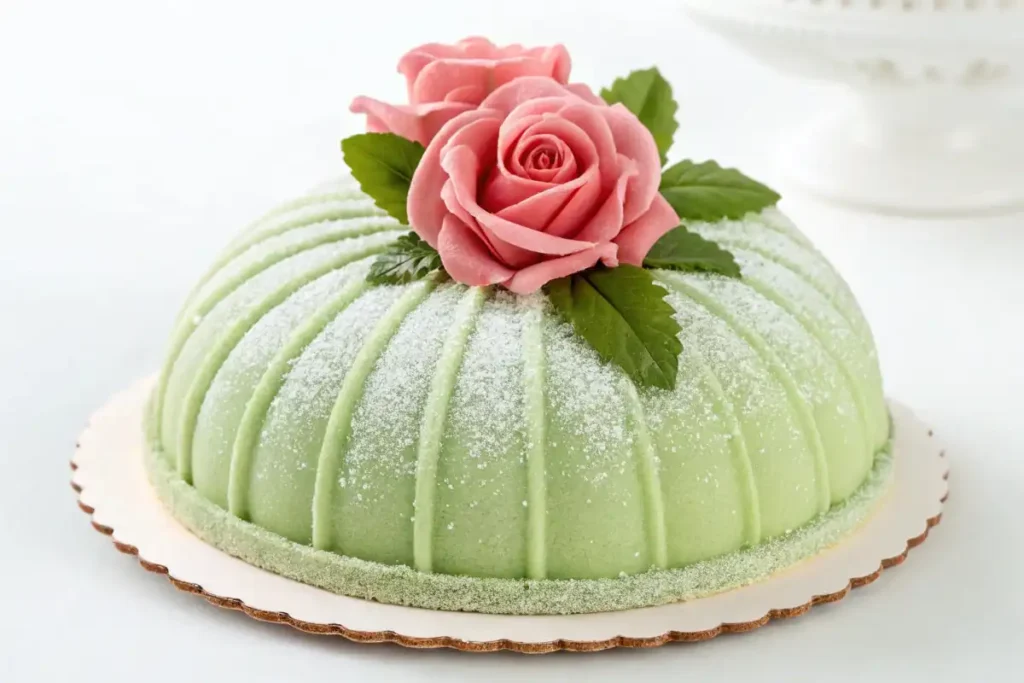
The princess cake, or “prinsesstårta” in Swedish, is a famous dome-shaped cake. It’s traditionally made with layers of sponge cake, pastry cream, and raspberry jam. A smooth, green marzipan covers the cake. It’s often topped with a pink marzipan rose. This cake is a festive treat that is both beautiful and delicious.
History of the Princess Cake
The princess cake originated in Sweden in the early 20th century. It was created by Jenny Åkerström, a teacher for the princesses of Sweden. It was originally called “green cake”. Its popularity grew. It became known as the princess cake because the princesses loved it. It’s now a classic Swedish treat. It’s often served at celebrations and special occasions.
Key Features of a Princess Cake
- Sponge Cake Layers: These form the base.
- Pastry Cream Filling: It provides a smooth, creamy texture.
- Raspberry Jam: It adds a sweet and slightly tart taste.
- Marzipan Coating: This gives the cake its iconic look.
- Marzipan Rose: The finishing touch, often pink.
How to Make a Princess Cake at Home
Princess Cake: Detailed Ingredients & Step-by-Step Instructions

Yields: 1 cake (approx. 8-10 servings)
Prep Time: 1 hour
Cook Time: 30-40 minutes
Total Time: About 2 hours (plus cooling time)
Ingredients
For the Sponge Cake:
- 4 large eggs, at room temperature
- 1 cup granulated sugar
- 1 cup all-purpose flour (or gluten-free blend)
- 1 teaspoon baking powder
- 1 teaspoon vanilla extract
- Pinch of salt
For the Pastry Cream:
- 2 cups whole milk
- 1/2 cup granulated sugar
- 1/4 cup cornstarch
- 4 large egg yolks
- 1 teaspoon vanilla extract
- Pinch of salt
For the Raspberry Jam Layer:
- 1/2 cup raspberry jam (seedless is preferred for a smoother texture)
For the Marzipan Coating & Decoration:
- 1 pound green marzipan (store-bought or homemade)
- 1/4 cup powdered sugar (for dusting when rolling marzipan)
- Pink marzipan (for the rose or other decorative elements), or pink food coloring if you are using only white marzipan
Additional Tools You’ll Need:
- Two 8-inch or 9-inch round cake pans
- Parchment paper
- Mixing bowls (various sizes)
- Electric mixer (hand or stand)
- Sifter
- Rubber spatula
- Saucepan
- Whisk
- Rolling pin
- Offset spatula or butter knife
- Cake stand or serving plate
- Optional: Cookie cutters and food coloring for additional decorations

Step-by-Step Instructions
1. Prepare the Sponge Cake:
- Preheat Oven and Prep Pans: Begin by heating your oven to 350°F (175°C). Take your cake pans. Grease them lightly. Add a circle of parchment paper to each pan’s bottom. This will keep the cake from sticking.
- Whisk Eggs and Sugar: In a large bowl, place the eggs and sugar. Use an electric mixer on high speed. Beat the mixture until it’s pale and fluffy. This should take 5-7 minutes. The mixture needs to have nearly tripled in volume.
- Sift Dry Stuff: In a separate bowl, sift the flour, baking powder, and salt. This makes the mixture smoother and removes any lumps.
- Combine Wet and Dry: Gently fold the sifted dry items into the egg mix. Do this in 2-3 batches. Use a rubber spatula, folding softly. Avoid overmixing. Keep the batter light and airy.
- Add Vanilla: Fold in the vanilla extract. Mix gently to combine.
- Bake: Split the batter evenly between the cake pans. Place them in the oven. Bake for 25-30 minutes. The cakes should be lightly golden and spring back when you touch them lightly.
- Cool: Let the cakes cool in the pans for 10 minutes. Then transfer them to a wire rack. Remove the parchment paper. Let them cool fully before assembling. This stops them from getting too soft and allows them to handle the cream and jam.
2. Make the Pastry Cream:
- Heat Milk Mixture: In a medium saucepan, add the milk, half of the sugar, and salt. Heat it over medium heat until it’s simmering. Do not let it boil.
- Whisk Yolks and Cornstarch: In a separate bowl, add the egg yolks and the rest of the sugar. Whisk until pale. Add the cornstarch and whisk again until it’s smooth.
- Temper the Yolks: Slowly pour a bit of the warm milk mixture into the egg yolk mix. Whisk continuously to warm the yolks gently. This is called tempering. It helps stop the eggs from scrambling.
- Combine Mixtures: Pour the tempered egg yolk mix into the milk mixture in the saucepan. Whisk constantly.
- Cook Until Thick: Continue cooking over medium heat. Whisk constantly. The mix will begin to thicken. Cook for 2-3 minutes after it thickens, until it’s like pudding.
- Add Vanilla and Cool: Remove from heat. Stir in vanilla extract. Pour the cream into a clean bowl. Place a sheet of plastic wrap directly on the surface. This will keep a skin from forming. Cool fully in the fridge. The cream should be very thick before using.
3. Assemble the Cake:
- Prepare Cake Layers: Once the cakes are cooled, level them using a long serrated knife. This ensures each cake layer is even. Place the first cake layer on a cake stand or serving plate.
- Add Cream Layer: Spread half of the pastry cream evenly over the cake layer. Use an offset spatula or the back of a knife.
- Add Jam Layer: Spread the raspberry jam evenly over the pastry cream.
- Add Second Cake Layer: Place the second cake layer on top.
- Shape the Dome: Use the remaining pastry cream to cover the top and sides. Try to make a dome shape. Create a gentle slope from the top to the edges. This shape is a classic part of the princess cake.
- Chill Cake: Put the cake in the fridge for 30 minutes. This makes it easier to handle.
4. Apply the Marzipan:
- Prepare Marzipan: Take the green marzipan. Knead it on a surface with a dusting of powdered sugar. This makes it easier to handle.
- Roll Marzipan: Use a rolling pin to roll the marzipan to about 1/8 inch thickness. It needs to be large enough to cover the entire cake.
- Drape over Cake: Carefully lift the rolled marzipan. Drape it over the cake. Try to center it.
- Smooth Marzipan: Use your hands to smooth the marzipan. Gently press it against the cake. Start from the top and work your way down. This will remove air bubbles and any creases.
- Trim Edges: Use a sharp knife to trim the excess marzipan. Make sure to leave a neat edge.
5. Add the Marzipan Rose:
- Create the Rose: Take a small amount of pink marzipan. Roll it into a ball. Flatten it. Shape it into petals. Layer them carefully to make a rose. If you prefer, buy a premade marzipan rose.
- Place Rose: Put the marzipan rose carefully on top of the cake. It should be in the center.
6. Final Touches & Serving:
- Chill: Chill the decorated cake in the fridge for about 30 minutes before serving.
- Serve: Serve the princess cake chilled, sliced into wedges. The cake is best enjoyed fresh.
Tips for Success
- Room Temperature Ingredients: Use room temperature eggs. They whip better. This will create a lighter cake.
- Don’t Overmix: Overmixing the cake batter makes it tough. Fold gently. Stop as soon as the dry items are blended.
- Cool Completely: Allow the sponge cake and pastry cream to cool fully. This ensures that they will hold up well when assembled.
- Even Marzipan: Roll the marzipan to an even thickness. This makes it easier to handle. Also, it looks more professional.
- Practice: Decorating takes practice. Do not give up. Every cake will get better.
- Storage: Store the cake in the fridge. Keep it covered. It will stay fresh for a couple of days.
This expanded recipe gives more detail. It is also easy to read. Enjoy making and eating your delicious princess cake

Alternative Toppings
Instead of a rose, try a marzipan star. Or use fresh berries. Chocolate shavings or edible glitter can add extra appeal. A dusting of powdered sugar is another simple yet elegant finishing touch. You could also create different designs using melted chocolate for a modern twist on this traditional cake.
Gluten-Free Adaptations
Use gluten-free flour to make the sponge cake. This makes the princess cake suitable for people who avoid gluten. Make sure to use a gluten-free baking powder to ensure the cake rises correctly. There are many great gluten-free flours. Almond flour and rice flour blends work very well.
Vegan Options
Replace eggs and dairy with plant-based alternatives. This creates a vegan princess cake. Use a vegan marzipan. You can use flaxseed as an egg replacement. Plant-based milk and butter will work great in the cream and sponge cake layers. Look for marzipan that does not use honey or egg white.
Mini Princess Cakes
Make smaller princess cakes for individual treats. This is a fun way to serve them at parties. These smaller versions can be just as impressive. They are also easier for guests to handle. Mini cakes are perfect for a buffet-style party. Each guest gets their own little princess cake.
Advanced Techniques and Tips
For those who want to refine their princess cake-making skills, here are some advanced techniques. These tips will help elevate your results and give you a more polished look.
Perfecting the Sponge Cake
Achieving a light and airy sponge cake is essential for a good princess cake. Use room-temperature eggs for better volume. Sift the dry items more than once to ensure a fine texture. Gently fold the dry stuff into the wet mix to avoid deflating the batter. Don’t overbake the cake. It should be lightly golden and spring back when touched.
Mastering the Pastry Cream
A smooth, lump-free pastry cream makes for a much nicer princess cake. Use a medium heat to avoid scorching. Stir the mix constantly. Add a little cornstarch for more thickness. Make sure to cook it until it has a smooth, pudding-like texture. After cooking, place it in an ice bath to cool quickly. This keeps it from developing a skin.
Working with Marzipan
Marzipan can be tricky. To keep it from sticking, roll it out on a lightly sugared surface. Use a rolling pin to ensure an even layer. If the marzipan is too stiff, add a tiny bit of water. Knead it until soft. When placing it on the cake, start from the top. Gently smooth it down the sides with your hands. This will prevent air bubbles from forming.
Creating Custom Marzipan Decorations
You can use food coloring to create detailed marzipan designs. You can also use molds to shape the decorations. Use small brushes to add intricate details. Get creative with different shapes and colors. Use edible glitters or paints to add shimmer. Practice decorating. Your skills will improve each time you make a cake.

Serving and Storing
A princess cake is best enjoyed fresh. Serve it soon after assembly. Keep it in the refrigerator if you need to store it. Cover it well to keep the marzipan fresh. It can last 2-3 days this way.
Serving Suggestions
- Serve with tea or coffee.
- Add a scoop of ice cream.
- Garnish with fresh berries.
- Present it on a beautiful cake stand. You can use a glass dome to keep the cake fresh and visually appealing.
- Offer it with a selection of other small desserts. This provides a variety for your guests.
- A side of fresh whipped cream complements the cake.
Storage Tips
- Store it in an airtight container.
- Keep it in a cool place. This prevents the marzipan from becoming too soft.
- Avoid storing it next to foods with strong smells. Marzipan can absorb odors.
- If you need to store it longer, consider freezing the sponge layers separately. Wrap them tightly in plastic before placing them in the freezer.
- Do not freeze a fully decorated cake if possible.
The Princess Cake’s Cultural Importance
The princess cake is more than a cake. It’s part of Swedish culture. It’s often seen at celebrations and important events. Its beautiful appearance and delicious taste make it a symbol of joy. It’s a perfect centerpiece for any occasion.
Princess Cake at Celebrations
It’s a must at birthday parties in Sweden. It’s also very popular at weddings and graduations. It signifies happiness and good times. Its presence makes any gathering feel more special. The cake can also make an appearance at family events like holiday gatherings and anniversaries.
A Gift of Appreciation
Giving a princess cake is a nice way to show gratitude. It’s a thoughtful gift that people will enjoy. This gesture often communicates care and kindness. It is perfect for both formal and informal occasions. The cake’s beauty makes it a perfect gift for anyone who appreciates fine desserts.
The Princess Cake: A Culinary Adventure
Making a princess cake is a chance to explore baking. It allows you to bring a bit of Swedish tradition into your home. This cake is suitable for all skill levels. Whether you are a beginner or an expert baker. Each layer has a purpose. It creates a masterpiece. It is more than the sum of its parts.
Why the Princess Cake Is So Special
It’s the balance of flavors and textures. It’s also the care that goes into making it. It’s a fun way to show off your creativity. You can use many variations for a unique cake. Sharing it with others is a way to connect. This cake creates fond memories. It’s a great choice for any special event.
Making it Your Own
The basic recipe is a foundation. You can change it to fit your liking. The possibilities are endless. It gives you the chance to try new flavor pairings. It allows you to play with colors and shapes. The marzipan is like a blank canvas. You can decorate it how you like. Making it a princess cake you can call your own.
Embarking on a Baking Journey
The princess cake is more than just a dessert. It’s a journey. Each step of the process is important. From the sponge to the final decoration. It provides a sense of accomplishment. It is a nice way to relax. The creation process itself is very rewarding. The final result is delightful, both to look at and to eat.
Frequently Asked Questions (FAQs)
Why is it called a Princess Cake?
The name comes from the fact that the Swedish princesses loved this cake when it was first created. They enjoyed it so much that the cake became associated with them.
Can I use different jams or fillings?
Yes, you can experiment with other jams or fillings. Strawberry, apricot, and blueberry work well. You can also try lemon curd. It’s fun to explore different options.
How do I prevent the marzipan from cracking?
Make sure the marzipan is at room temperature. Also, roll it evenly. Use a bit of powdered sugar to prevent sticking. This should help avoid cracking.
Is it necessary to color the marzipan green?
No, it’s not essential. You can use any color you prefer. Green is the traditional color, but feel free to use what you like best.